Designing the instruments and controls for BLOODHOUND SSC is an ongoing process. We’re still refining the details of the various systems: electrics, hydraulics, engine start and control systems (for all 3 engines – the EJ200 jet, rocket and the high performance race car engine), safety monitoring, etc. Once that’s complete we can finalise the design of the cockpit instruments.
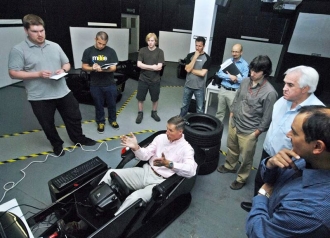 The Intel/Cursive/Race Centre team discussing the first run of the prototype Driving Experience
In the meantime, what we can do is test some ideas with various ‘simulators’ and ‘emulators’ (in simple driver terms, a simulator is designed to make the driver think that he/she is in the car and an emulator is designed to make the car’s systems think that they’re in the car – a small but important difference). The first part of this process starts with a ‘BLOODHOUND Driving Experience’, which has already proved hugely popular with the public and of course with our schools audiences. The purpose of the ‘Driving Experience’ is to give you (and me!) a first look at driving BLOODHOUND, using prototype instrument designs, a realistic performance model and some high-quality graphics. To produce this, we had help from Intel, together with Cursive Simulation and the Race Centre in Southampton.
The Driving Experience will not be a simulator as such. A proper simulator for BLOODHOUND SSC would take hours of study just to understand how it worked, then perhaps 20 minutes to get all the systems up and running and the engines started, and there would be plenty of little snags to look at – any one of which could stop the car running. All in all, it would be a technically complex, time-consuming and occasionally frustrating experience – just like the real thing! Instead, the Driving Experience will give you a chance to jump in and have a go at a 1000mph run, without too many ‘real-world’ problems. You will have to control the jet and rocket power, accelerating each one at the right rate and the right time, while you try to keep the car straight against the virtual effects of cross-winds, surface changes and so on.
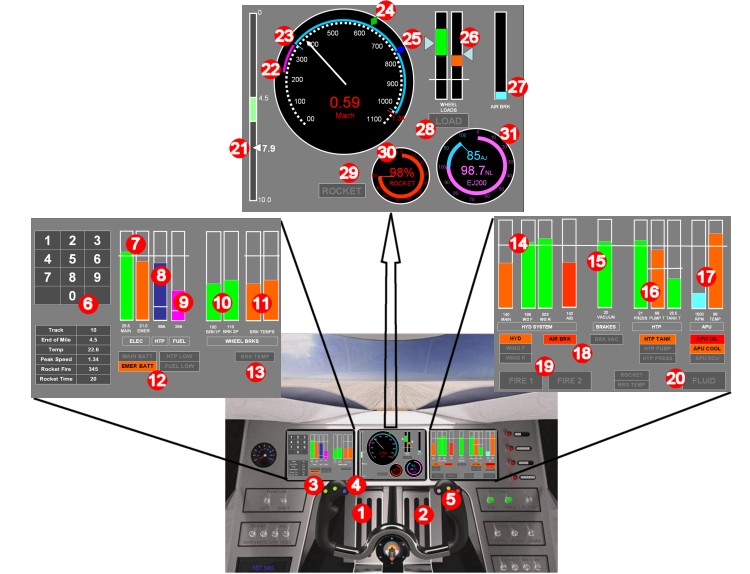
So what instruments is the Driving Experience going to have? The picture describes the current instrument layout and the basic functions of each one. When you are in the Driving Experience, you will see a number of these moving at the same time – such as temperatures and pressures – but the good news is that none of them will fail at any stage (it’s not a simulator!) so you can ignore everything except the gauges on the centre screen. If you are a real lead-foot on the brakes, you might also need to look at the brake temperatures at the end of the run, to avoid setting fire to them….
The task in the Driving Experience is to:
- Release the brakes (left foot pedal)
- Accelerate the jet engine (right foot pedal), following the speed cue on the gauge to avoid ‘surging’ (overloading) the engine
- Keep the car straight with the steering wheel
- Light up the rocket to idle (left trigger on the steering wheel) at the first rocket cue
- Increase the rocket to full power (right trigger on the steering wheel) at the second rocket cue
- Keep steering all the way to the end of the measured mile!
- Throttle back (right pedal) and shut down the rocket (release the triggers)
- Wait for the airbrake cue and deploy the airbrake (first button on the left of the steering wheel), or
- If you miss the airbrake cue, then deploy one of the brake chutes (the other 2 buttons on the left of the steering wheel) at the chute cue
- Keep steering
- Look ahead to see the recovery crew
- Wheel brakes below 200 mph (left pedal) to stop the car next to them.
- Jump out and celebrate a successful run – Simple!
Now that you’ve learned the sequence, here are the controls:
Hover your mouse over the numbers to find out what all the labelled controls and instruments do. You’ll need to know some of this before you have a go in the BLOODHOUND Driving Experience – then come and give it a go at one of the future BLOODHOUND events!
- p1
- 1. Brake Pedal
- p2
- 2. EJ200 Jet Engine pedal. The first 60% of the movement controls the ‘dry’ power range, the final 40% controls the reheat
- p3
- 3. Green buttons on the left side of the steering wheel – 2 brake chutes
- p4
- 4. Blue button on the left side of the steering wheel– airbrake
- p5
- 5. Radio and abort buttons (not used in the Driving Experience)
- p6
- 6. Data input keypad – the data is shown below the keypad and will vary from run to run. This tells the Car where it is and what the driver intends to do during the run, so that all of the speed and distance cues are calculated correctly
- p7
- 7. Battery voltages (24V Car power system)
- p8
- 8. HTP quantity – this will read about one tonne at start up: enough for 20 sec of rocket firing!
- p9
- 9. Jet fuel quantity – this will start at 400 kg and around 150 kg will be used during a run
- p10
- 10. Pressures applied to the wheel brakes when the brake pedal is pressed
- p11
- 11. Brake disc temperatures – for carbon discs, this can be over 1000 deg C
- p12
- 12. Warning captions – in case any of the above gauges go out of pre-set limits
- p13
- 13. Brake temperature warning, in case the driver is particularly hard on the brakes – this will come on at around 1000 deg C
- p14
- 14. Hydraulic system pressures – each system has its own accumulator. If the main system fails, these gauges will show what has failed and what is still working
- p15
- 15. Vacuum pressure for the wheel brakes – much like a road car system
- p16
- 16. HTP tank pressure, and tank and pump temperatures – any increase in temperature and we will immediately abort the run and flush the tanks, just in case
- p17
- 17. The RPM and coolant temperature for our 800 hp piston engine Auxiliary Power Unit (APU), which drives the HTP pump
- p18
- 18. Warning captions, to highlight any gauge out of limits
- p19
- 19. FIRE captions to indicate a high temperature has been detected in one of the rear bays
- p20
- 20. FLUID caption, to show that there is a leak somewhere in the APU bay
- p21
- 21. Distance run indicator, to back up the mile markers on the track
- p22
- 22. The start of the purple sector on the speedometer is the Rocket idle firing cue (left trigger on the steering wheel)
- p23
- 23. The start of the blue sector on the speedometer is the Rocket full power firing cue (right trigger)
- p24
- 24. Green diamond – brake chute cue (if the airbrakes are not already out)
- p25
- 25. Blue diamond – airbrake deployment cue
- p26
- 26. Loads on the front and rear wheels. These wheel loads are the most important safety element in the Car. If these stay within limits, then all will be well – so I’ll be watching them closely!
- p27
- 27. Airbrake position indicator
- p28
- 28. LOAD caption – in case the wheel loads start getting too low for comfort
- p29
- 29. ROCKET caption to indicate that the rocket safety systems have detected a problem and commanded an automatic rocket shutdown
- p30
- 30. Rocket power output. I may not use this much in the Car (the acceleration will let me know that it’s working!) but it will help in the Driving Experience
- p31
- 31. EJ200 power output – the purple sector is the ‘dry’ range (i.e. engine RPM) and the blue sector is the reheat (it actually shows is the area of the nozzle at the back end of the engine – a good indicator of reheat power output)